What is Compound Path in Silhouette Studio?
Jun 09, 2021
When creating a design in Silhouette Studio, there are many tools that can be helpful. Understanding how to manipulate your design to turn it into a stencil can be tricky, but understanding the tools you need at the right time can make it a breeze. Compound path is one of those must-have tools.
What is a compound path?
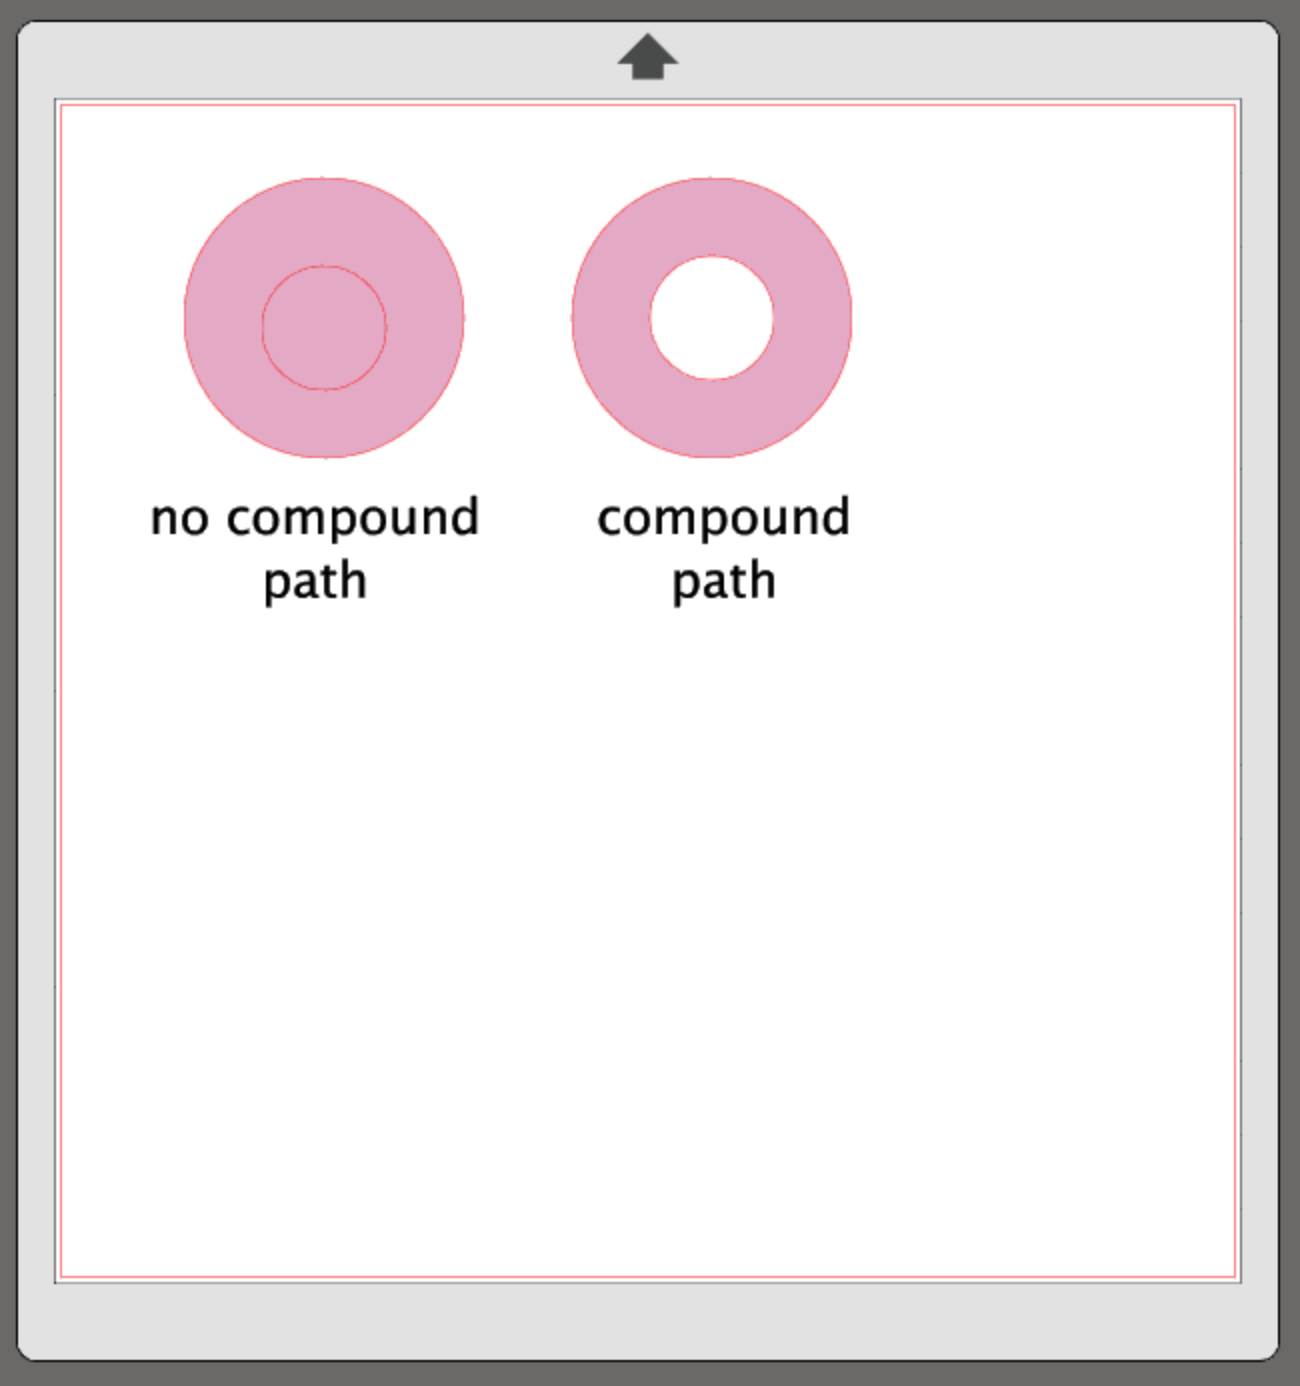
Compound path takes elements of a design and "compounds" them as you can see above in the donut images. It makes a design into a single layer. I always say that it is like using a punch tool. Do you see how it punched out the center of the donut? For example, with the donut image, you would want the center to be transparent. If you draw a large circle, and then a smaller circle on top of it and group them together, Silhouette Studio will think of this as two shapes. If you fill it with color, it looks as if there is no center. If you used the compound path tool instead, it would make the donut one layer and the center becomes transparent.
What is the difference in compound path and grouping?
When you group elements in a design together, they remain together, but they are not compounded. The design contains many elements and are not a single layer design. If a design is grouped, it only means that the elements of a design will stay together in your workspace. They will still cut correctly because all of the cut lines are there. Grouping keeps you from accidentally grabbing part of a design and moving it unintentionally. This is when the undo button comes in handy! Grouping is helpful for paper piecing, t-shirt designs, printables, etc when you want to cut or print a design with many different layers or colors.
Why do I need to make designs a compound path?
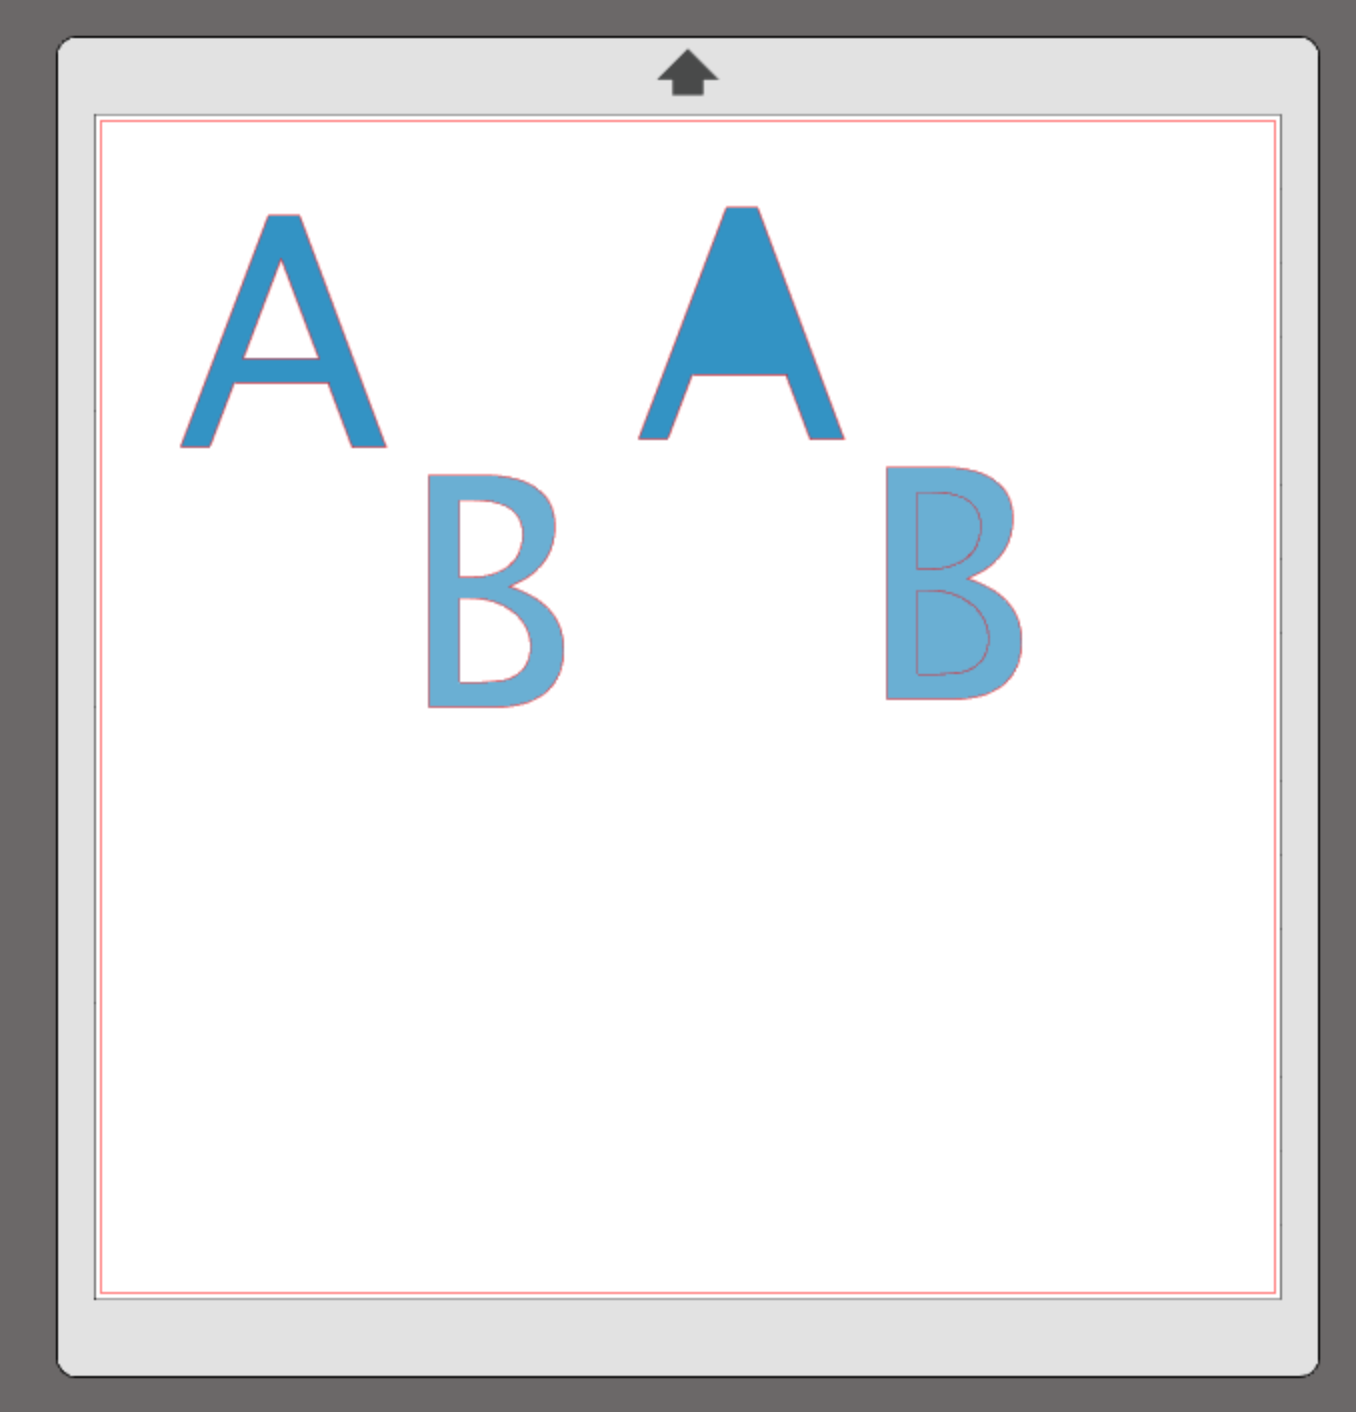
If a letter is not a compound path and the letter has counters, the counters look like they are not there (an example of a counter is the inside part of an a, b, d, etc.). It is easy to see if designs are a compound path when they are filled with color. The design will look as it should. If they are filled with color and not a compound path, you will only see the outermost shape of the design and a lot of bounding boxes and perhaps some cut lines if they are a different color than the rest of the design. This means that all of the elements of the design are there, but not a compound path. If a design is not filled with color, it may be hard to tell if it is a compound path or grouped. It is easier to show you than to tell you, so take a look at the quick video above.
Where can I find the compound path tool to help modify my design?
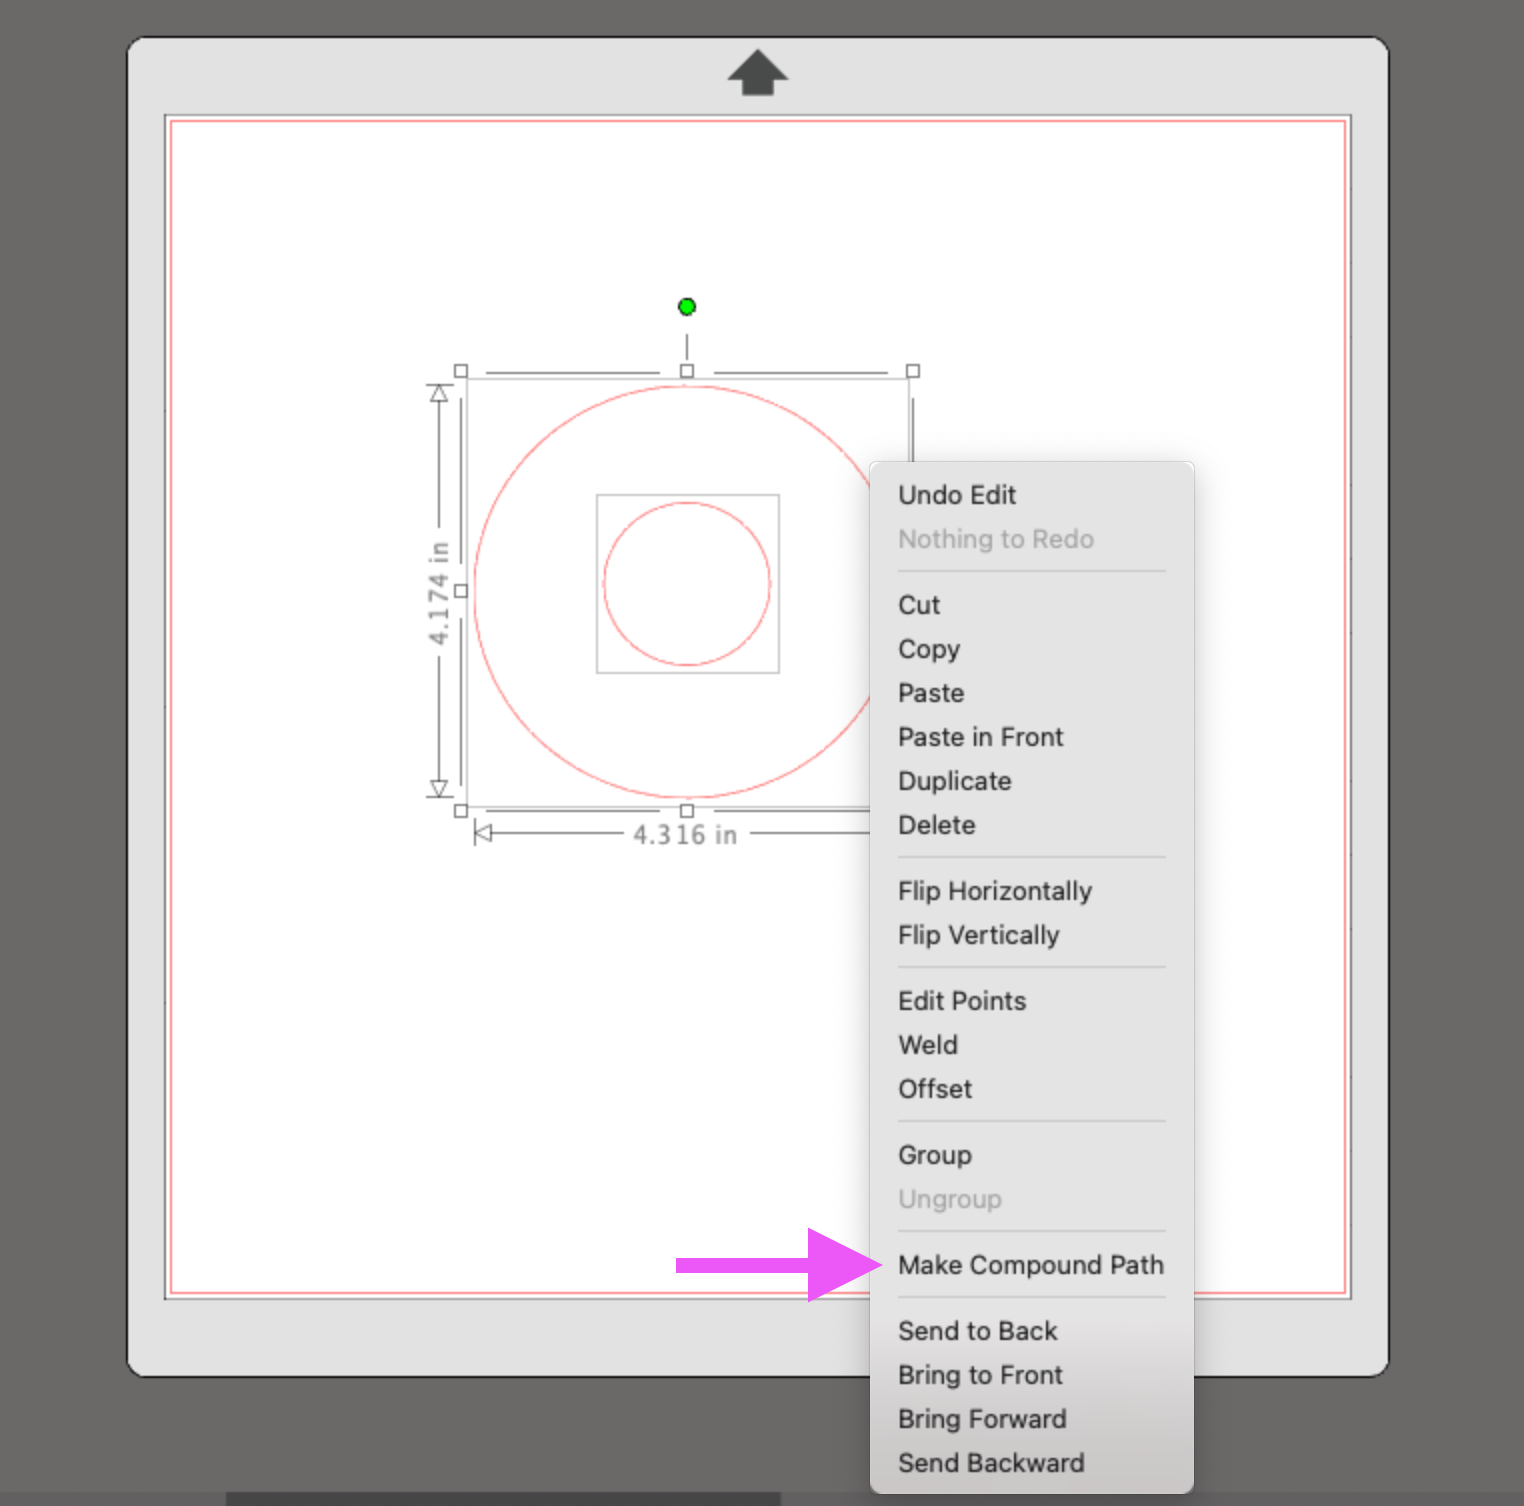
There are a few ways to make a compound path. You must first select the elements of the design.
- Click Object in the top tool bar>>Make Compound Path
- Right click>Make Compound Path
- Use the shortcut Command+E on a Mac or Control+E on a PC.
Releasing a Compound Path
Sometimes you need to release a compound path to make changes to a design. As you create more stencils, you will know what size the elements in a design need to be. If you have a design that you'd like to make changes to and can't figure out how to separate the elements of it, try releasing the compound path. If it does not release, try ungrouping. Sometimes you need to ungroup a design more than once. Some designs may have elements inside of elements that have grouped many times.
There are a few ways to release a compound path. You must first select the elements of the design.
- Click Object in the top tool bar>>Release Compound Path
- Right click>Release Compound Path
- Use the shortcut Command+Shift+E on a Mac or Control+Shift+E on a PC.
I hope that helps you understand compound path vs grouping a little better. It is one of the most confusing things when you are a beginner. It is easier to understand with practice and before long, you will know exactly when this step is needed in the design process.
Here is a link to the Silhouette Studio software. I recommend that everyone design with this software (even if you cut your stencils on a Cricut, you can still use this software to design your stencils). It is the best software for designing stencils and it gives you total creative freedom!
Happy designing!

*some of these items may be affiliate links... this just means we may receive a small percentage of the sale for sharing the products with our customers. But your price will be the same :0)

START CUTTING COOKIE STENCILS TODAY!
Download my Free PDF to find out what you need to start cutting cookie stencils!
Be looking for more freebies and fun tips in your inbox!
We hate SPAM. We will never sell your information, for any reason.
